In this tutorial, I will guide you through install GitLab on your local macOS machine using Docker. GitLab is a powerful DevOps platform that provides source code management, CI/CD, and other essential tools for software development. By setting up GitLab locally, you’ll be able to manage your projects and pipelines in a self-contained environment for development and testing purposes.
Prerequisites
🚨 Please note: If you already have Docker Desktop installed on your machine, you can skip this entire prerequisites section.
Docker cli: Ensure that the Docker CLI is installed on your machine.
Colima: Colima is an alternative to Docker Desktop for macOS. Follow this blog post to learn more about colima and how to install it on macOS.
Starting colima:
Start Colima with the following configuration:
colima start --cpu 4 --memory 8 --mount-type 9p --vm-type=qemuColima configuration options:
--cpu 4: Specifies 4 CPUs to allocate to the virtual machine, ensuring sufficient processing power.--memory 8: Allocates 8 GB of RAM to the virtual machine, which is optimal for running GitLab and associated services.--mount-type 9p: Uses the 9p mount type for file sharing between macOS and the virtual machine, providing efficient and seamless access to files.--vm-type=qemu: Uses the QEMU hypervisor for virtualization, which is compatible with Colima and macOS environments.
These configuration options are chosen to optimize performance and compatibility for running GitLab on your local macOS machine.
GitLab installation steps
Create docker network:
docker network create gitlab-networkDocker network is created to facilitate communication between the GitLab container and the GitLab Runner container, enabling seamless integration and execution of CI/CD pipelines.
Create docker volumes:
1
2
3
docker volume create gitlab-config docker volume create gitlab-logs docker volume create gitlab-dataDocker volumes are chosen to manage data and configuration persistently within the GitLab container, overcoming any permission-related challenges associated with bind volumes on macOS.
Start the GitLab container:
 1
 2
 3
 4
 5
 6
 7
 8
 9
10
11
12
13
14
15
docker run \ --detach \ --restart always \ --name gitlab-ce \ --publish 22:22 \ --publish 80:80 \ --publish 443:443 \ --publish 5005:5005 \ --hostname gitlab.example.com \ --network gitlab-network \ --env GITLAB_OMNIBUS_CONFIG="external_url 'http://gitlab.example.com'" \ --volume gitlab-config:/etc/gitlab \ --volume gitlab-logs:/var/log/gitlab \ --volume gitlab-data:/var/opt/gitlab \ --shm-size 2gb yrzr/gitlab-ce-arm64v8:latestConfiguration options
--detach: Runs the container in the background (detached mode), allowing you to continue using the terminal.--restart always: Ensures that the container restarts automatically if it stops or the Docker service restarts.--name gitlab-ce: Assigns the name “gitlab-ce” to the container for easy identification and management.--publish 22:22: Maps port 22 of the container to port 22 on the host. This is typically used for SSH access.--publish 80:80: Maps port 80 of the container to port 80 on the host, which is used for HTTP access to GitLab.--publish 443:443: Maps port 443 of the container to port 443 on the host, which is used for HTTPS access to GitLab.--publish 5005:5005: Maps port 5005 of the container to port 5005 on the host, which is used for container registry in Gitlab.--hostname gitlab.example.com: Sets the container’s hostname to “gitlab.example.com” for network identification.--network gitlab-network: Connects the container to the “gitlab-network” Docker network, enabling communication with other containers in the same network.--env GITLAB_OMNIBUS_CONFIG="external_url 'http://gitlab.example.com'": Sets an environment variable to configure GitLab with an external URL.--volume gitlab-config:/etc/gitlab,--volume gitlab-logs:/var/log/gitlab,--volume gitlab-data:/var/opt/gitlab: Mounts Docker volumes (gitlab-config, gitlab-logs, gitlab-data) to persist configuration files, logs, and data within the container.--shm-size 2gb: Sets the shared memory size limit to 2GB for the container.yrzr/gitlab-ce-arm64v8:latest: I chose the yrzr/gitlab-ce-arm64v8:latest image because it is specifically built to support macOS ARM architecture, ensuring compatibility and optimal performance for running GitLab on Mac machines with ARM processors.
Access GitLab:
- Create an entry in macOS’s
/etc/hostsfile to access gitlab with custom host name.
127.0.0.1 gitlab.example.com- Open your web browser and go to http://localhost (or
http://gitlab.example.comif you set a custom hostname). - You should see the GitLab login page. Sign in with the username root and the password from the following command:
docker exec -it gitlab-ce grep 'Password:' /etc/gitlab/initial_root_password- Create an entry in macOS’s
GitLab Runner installation steps
Configuring a GitLab Runner involves installing the runner, registering it with your GitLab instance, and setting it up to run your CI/CD jobs. Here’s a step-by-step guide on how to do it:
Create docker volumes:
docker volume create gitlab-runnerRegister GitLab Runner:
docker run --rm -t -i -v gitlab-runner:/etc/gitlab-runner --network gitlab-network gitlab/gitlab-runner:latest register --docker-network-mode gitlab-networkFollow the prompts to register the runner:
- Enter the GitLab instance URL: e.g.
http://gitlab.example.com - Enter the registration token: This can be found in your GitLab project under Settings > CI/CD > Runners.
- Enter a description for the runner: This is just a label to identify your runner.
- Enter tags for the runner: Tags are used to limit which jobs can be picked by this runner.
- Enter the executor: Choose docker as the executor.
- Enter the default Docker image: Choose a Docker image that will be used to run your jobs, e.g.
alpine:latest.
- Enter the GitLab instance URL: e.g.
Run the GitLab Runner:
docker run -d --name gitlab-runner --restart always --network gitlab-network -v gitlab-runner:/etc/gitlab-runner -v /var/run/docker.sock:/var/run/docker.sock gitlab/gitlab-runner:latestMount docker daemon:
Since we are using the Docker executor with the
alpine:latestimage to run the jobs, we must mount the Docker daemon as a volume in the job container so that it can build the application images during the pipeline execution.you need to add the following configurations, highlighted in the
config.tomlfile below:1concurrent = 1 2check_interval = 0 3connection_max_age = "15m0s" 4shutdown_timeout = 0 5 6[session_server] 7 session_timeout = 1800 8 9[[runners]] 10 name = "gitlab-runner" 11 url = "http://gitlab.example.com/" 12 id = 1 13 token = "EJmTLgxhdPYfqKYQkqd1" 14 token_obtained_at = 2024-07-31T12:33:23Z 15 token_expires_at = 0001-01-01T00:00:00Z 16 executor = "docker" 17 [runners.custom_build_dir] 18 [runners.cache] 19 MaxUploadedArchiveSize = 0 20 [runners.cache.s3] 21 [runners.cache.gcs] 22 [runners.cache.azure] 23 [runners.docker] 24 tls_verify = false 25 image = "alpine:latest" 26 privileged = false 27 disable_entrypoint_overwrite = false 28 oom_kill_disable = false 29 disable_cache = false 30 volumes = ["/cache", "/var/run/docker.sock:/var/run/docker.sock"] 31 network_mode = "gitlab-network" 32 shm_size = 0 33 network_mtu = 0To update the config.toml, follow these steps:
- Access the GitLab Runner container
docker exec -it <gitlab-runner-container-id> /bin/bash- Edit the
config.tomlfile
vi /etc/gitlab-runner/config.toml- After adding volume details in
config.toml, Save the changes and restart the GitLab Runner
1
2
gitlab-runner restart exitVerify the runner:
- Go to your GitLab project.
- Navigate to Settings > CI/CD > Runners.
- Verify that your runner is listed as active.
By following these steps, you will have a GitLab Runner configured and ready to run your CI/CD jobs.
Test a Simple CI/CD Pipeline
Create a .gitlab-ci.yml File:
In your project repository, create a file named .gitlab-ci.yml with the following content
1
2
3
4
5
6
7
8
9
stages: - test test_job: stage: test tags: - gitlab-runner script: - echo "Running tests..." - echo "This is a test job."Commit and Push:
Commit the .gitlab-ci.yml file to your repository and push it to GitLab.
1
2
3
git add .gitlab-ci.yml git commit -m "Add CI pipeline configuration" git push origin mainCheck Pipeline Status:
- In your GitLab project, go to CI/CD > Pipelines.
- You should see a new pipeline triggered by the commit.
- Click on the pipeline to see the jobs and their status.
Enable GitLab container registry (optional)
Create certificate
First, you’ll need to generate a private key and a self-signed certificate using OpenSSL.
Open a terminal on your Mac.
Create a directory to store the SSL certificate and key
1
2
mkdir -p ~/certificates/gitlab-registry cd ~/certificates/gitlab-registryGenerate a private key
openssl genrsa -out registry.gitlab.example.com.key 2048Create an OpenSSL configuration file:
You will need a configuration file that specifies the SAN. Here’s an example of a simple configuration file (openssl-san.cnf)
 1
 2
 3
 4
 5
 6
 7
 8
 9
10
11
12
13
14
15
16
17
18
19
20
21
22
23
24
[ req ] default_bits = 2048 prompt = no default_md = sha256 distinguished_name = dn req_extensions = req_ext x509_extensions = v3_ca # The extensions to add to the self signed cert [ dn ] C = India ST = Rajasthan L = Jodhpur O = PiyushKashyap OU = DevOps CN = registry.gitlab.example.com [ req_ext ] subjectAltName = @alt_names [ v3_ca ] subjectAltName = @alt_names [ alt_names ] DNS.1 = registry.gitlab.example.com[req]: Configuration for the certificate request process.default_bits: Specifies the key size (2048 bits).prompt: Disables prompting for DN fields during the certificate generation.default_md: Sets SHA256 as the default message digest algorithm.distinguished_name: Points to the [dn] section for the certificate’s DN fields.req_extensions: Refers to [req_ext] for request-specific extensions.x509_extensions: Refers to [v3_ca] for additional x509 extensions (used for CA certificates).[dn]: Defines the distinguished name fields: C, ST, L, O, OU, CN: Specifies the certificate’s country, state, locality, organization, organizational unit, and common name (here, the domain registry.gitlab.example.com).[req_ext]: Defines extensions for the certificate request.subjectAltName: Points to the [alt_names] section for defining alternative DNS names.[v3_ca]: Specifies x509 CA extensions.subjectAltName: Same as req_ext, referring to [alt_names] for SAN entries.[alt_names]: Lists alternative DNS names for the certificate.DNS.1: Sets the first alternative DNS name to registry.gitlab.example.com.
Generate a self-signed certificate
openssl req -new -x509 -key registry.gitlab.example.com.key -out registry.gitlab.example.com.crt -days 365 -config openssl-san.cnfVerify the certificate: After creating the certificate, verify if the SAN is included
openssl x509 -in registry.gitlab.example.com.crt -noout -text | grep -A1 "Subject Alternative Name"This command should show the SANs like this
1
2
X509v3 Subject Alternative Name: DNS:registry.gitlab.example.com
Configure certificate
Once you have your certificate and key, you need to configure GitLab to use them for the registry.
- Create /etc/gitlab/ssl/ directory inside your GitLab container
docker exec -it gitlab-ce mkdir -p /etc/gitlab/ssl - Copy the certificate and key to the GitLab container
1
2
docker cp registry.gitlab.example.com.crt gitlab-ce:/etc/gitlab/ssl/ docker cp registry.gitlab.example.com.key gitlab-ce:/etc/gitlab/ssl/ - Edit the GitLab Configuration to use the SSL certificate and key for the registryFind below lines in the gitlab.rb file, These lines are commented out indicated by the # at the beginning of each line. To enable the Container Registry, you’ll need to uncomment these lines and modify them as below.
docker exec -it gitlab-ce vi /etc/gitlab/gitlab.rb1 2 3 4 5registry_external_url 'https://registry.gitlab.example.com:5005' gitlab_rails['registry_enabled'] = true gitlab_rails['registry_host'] = "registry.gitlab.example.com" gitlab_rails['registry_port'] = "5005" gitlab_rails['registry_path'] = "/var/opt/gitlab/gitlab-rails/shared/registry" - Reconfigure and Restart GitLab
1
2
docker exec -it gitlab-ce gitlab-ctl reconfigure docker exec -it gitlab-ce gitlab-ctl restart
Trust certificate
We will add the certificate to the trusted certificate store within the Colima environment. This certificate needs to be applied to Docker within Colima so that it can pull images from the GitLab private registry without the “unknown authority” error.
colima ssh -- sudo sh -c "openssl s_client -showcerts -connect registry.gitlab.example.com:5005 </dev/null 2>/dev/null|openssl x509 -outform PEM > /usr/local/share/ca-certificates/internal.crt && update-ca-certificates && cat /var/run/docker.pid | xargs kill"
This command will download the certificate, install in the certificate storage in the colima virtual machine in one go and restart the docker process.
Test registry
Create an entry in macOS’s /etc/hosts file to access registry with custom host name.
127.0.0.1 registry.gitlab.example.com
In GitLab, go to your project and click on Container Registry from the left sidebar under the Deploy section. You should see the Container Registry page with Docker CLI commands similar to what is shown in the image below.
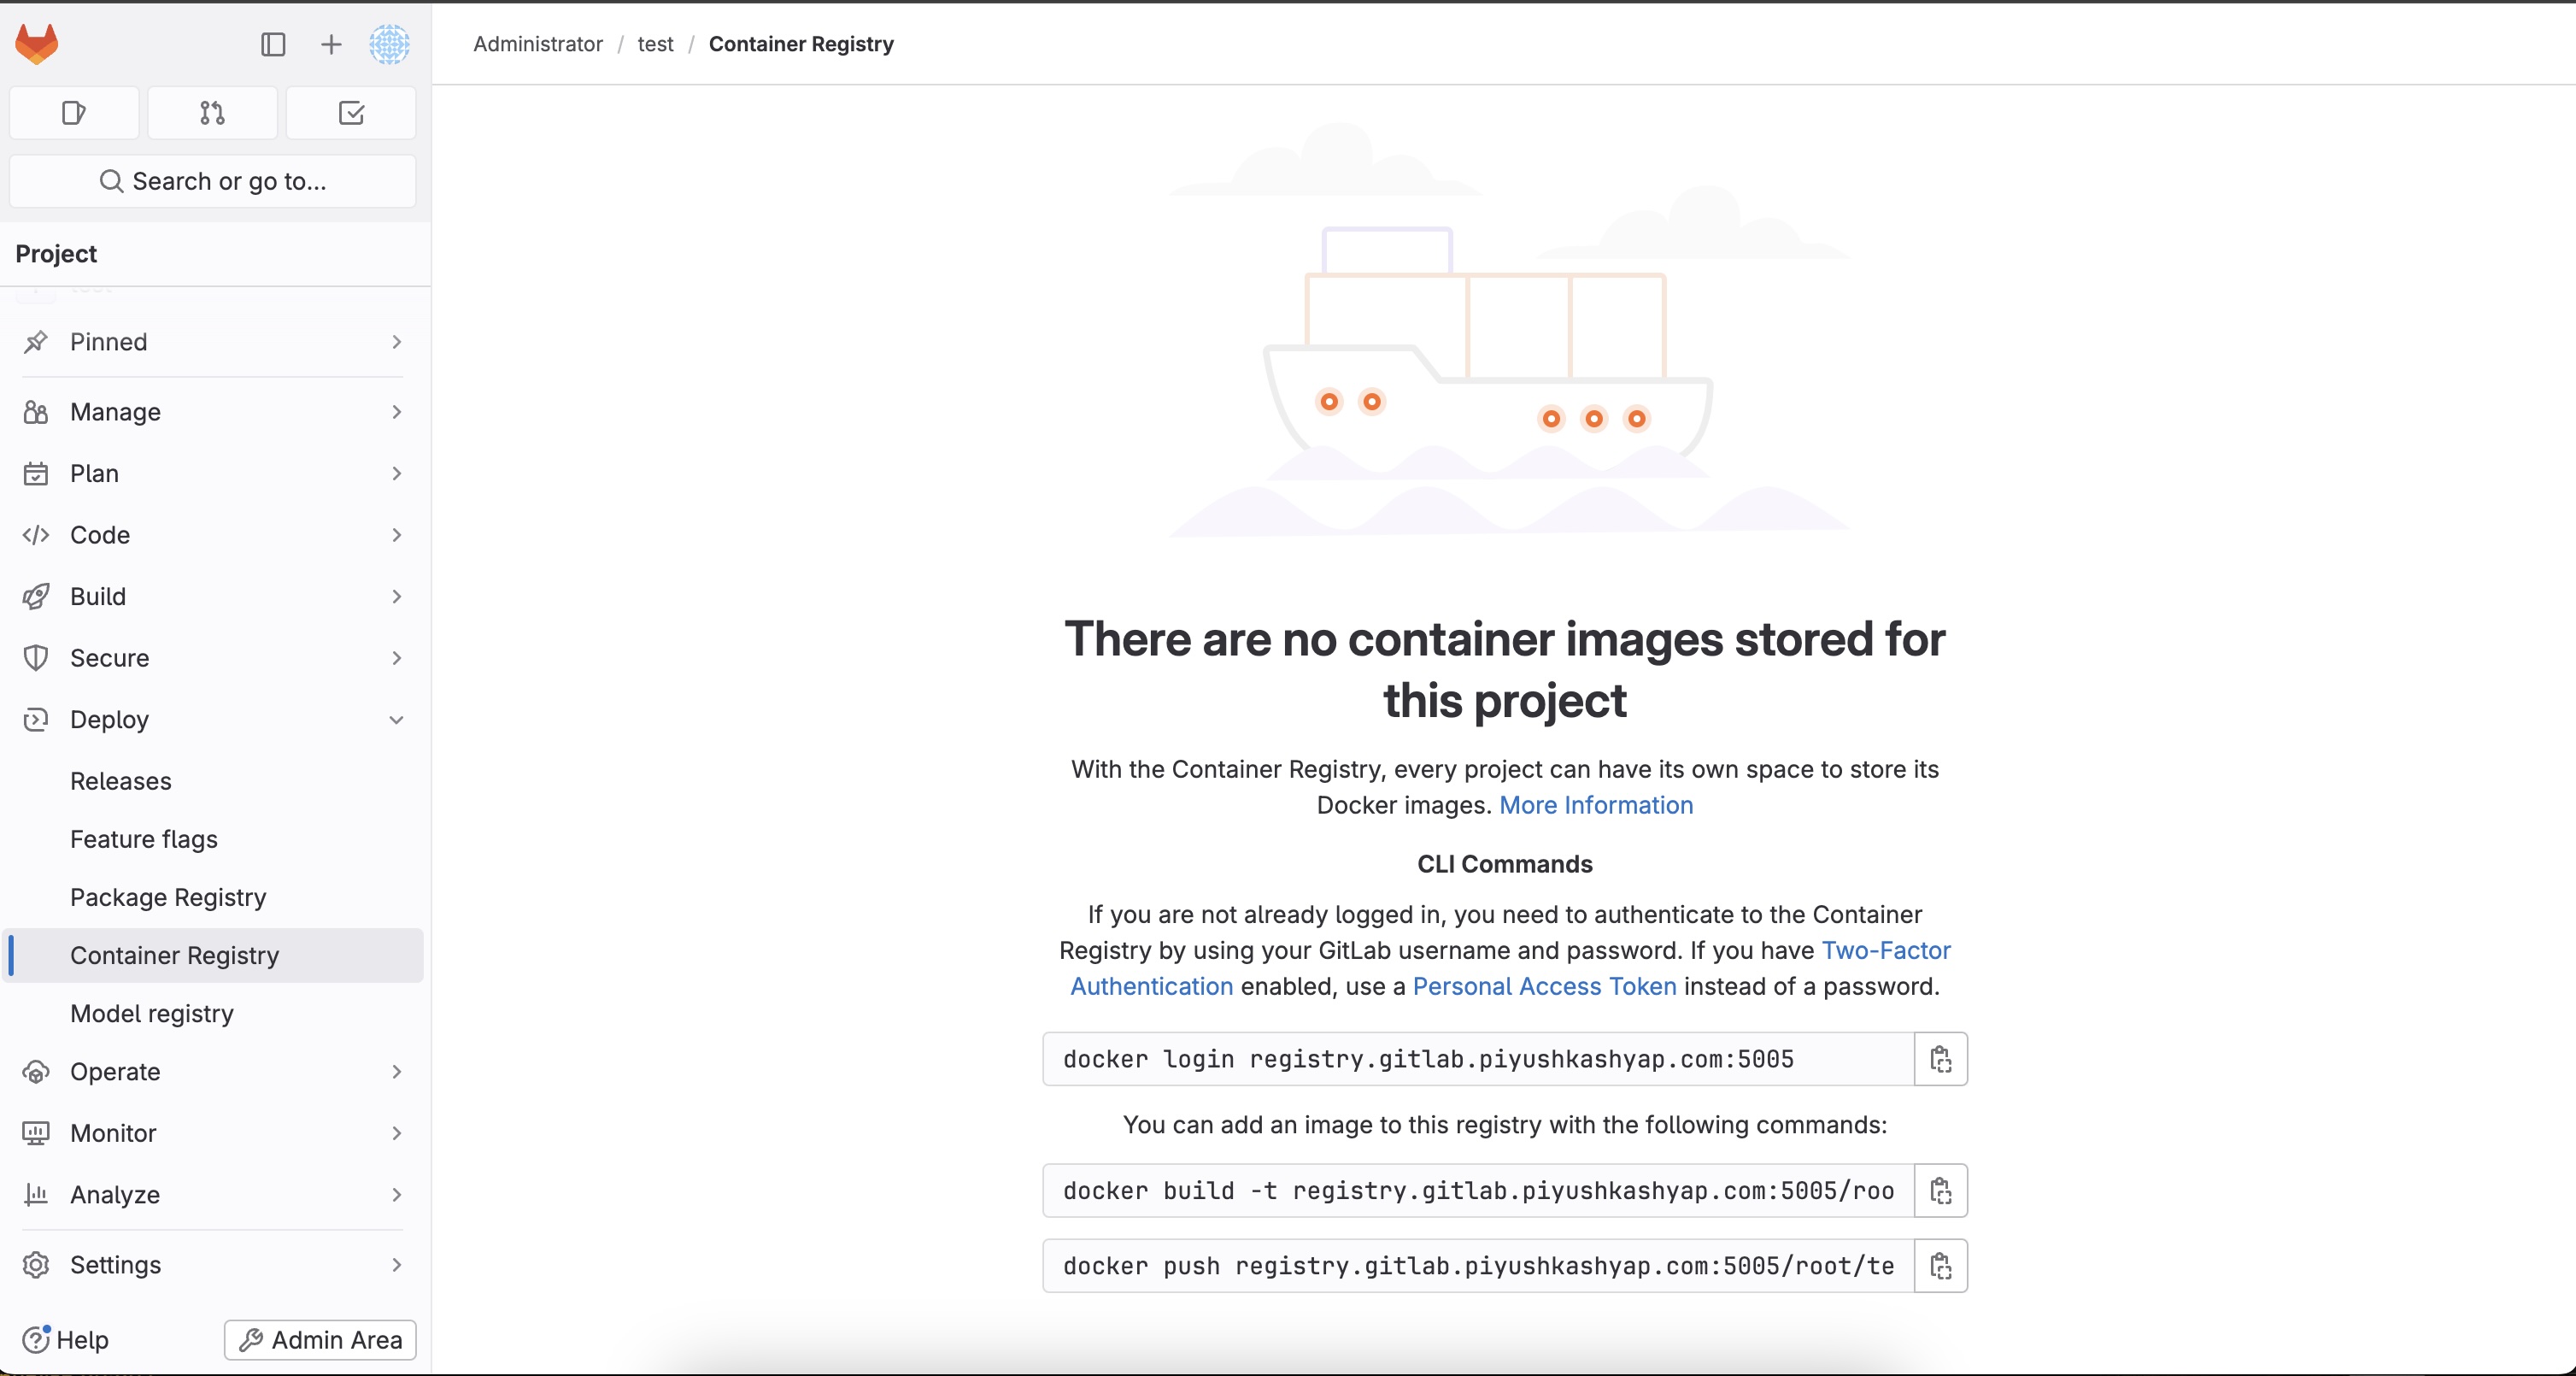
Run these docker commands from your local machine to connect, build and push image to container registry.
GitLab Troubleshooting
Reset GitLab user password:
Access the GitLab Container
First, get into your running GitLab container
docker exec -it gitlab-ce /bin/bashReset the Password
Once inside the container, run the following command to reset the user password.
gitlab-rails console -e productionIn the Rails console, execute the following commands to reset the user password.
1
2
3
4
user = User.find_by(username: 'piyush') user.password = 'new_password' user.password_confirmation = 'new_password' user.save!Exit the Container
Type exit to leave the Rails console and then exit again to leave the container.
Check Container Logs:
By reviewing logs for both GitLab and the GitLab Runner containers you can gather crucial error messages and diagnostic information to resolve operational challenges effectively.
1
2
docker logs gitlab-ce docker logs gitlab-runnerReconfigure GitLab:
If there have been changes to the GitLab configuration, reconfigure and restart the GitLab services.
1
2
docker exec -it gitlab-ce gitlab-ctl reconfigure docker exec -it gitlab-ce gitlab-ctl restartShow GitLab Runner config:
docker exec -it gitlab-runner cat /etc/gitlab-runner/config.tomlCheck DNS Resolution within Runner:
Ensure that the runner can resolve gitlab hostname gitlab.example.com correctly.
docker run --rm -it --network gitlab-network alpine nslookup gitlab.example.com
Feel free to reach out with any questions or feedback. Happy GitLabbing!